- Published on
Build a new sveltekit skeleton project with tailwindcss && DaisyUI
- Authors

- Name
- Farland Liu
How to build a new skeleton sveltekit project with DaisyUI / Tailwindcss. We will also add the fontsource and iconify.
create a svelte starter project
$npm create svelte@latest svelte-app-starter

create-svelte version 6.0.9

┌  Welcome to SvelteKit!
│
◇  Which Svelte app template?
│  Skeleton project
│
◇  Add type checking with TypeScript?
│  Yes, using TypeScript syntax
│
◇  Select additional options (use arrow keys/space bar)
│  Add ESLint for code linting, Add Prettier for code formatting
│
└  Your project is ready!

✔ Typescript
  Inside Svelte components, use <script lang="ts">

✔ ESLint
  https://github.com/sveltejs/eslint-plugin-svelte

✔ Prettier
  https://prettier.io/docs/en/options.html
  https://github.com/sveltejs/prettier-plugin-svelte#options

Install community-maintained integrations:
  https://github.com/svelte-add/svelte-add

Next steps:
  1: cd svelte-app-starter
  2: npm install
  3: git init && git add -A && git commit -m "Initial commit" (optional)
  4: npm run dev -- --open

To close the dev server, hit Ctrl-C

Stuck? Visit us at https://svelte.dev/chat

# install the package
$cd svelte-app-starter
$npm i
install Tailwind css and Typography
$npx svelte-add@latest tailwindcss
➕ Svelte Add (Version 2024.02.160.00)
The project directory youa re giving to this command cannot be determined to be guaranteed fresh — maybe it is, maybe it isnt. If any issues arise after running this command, please try again, making sure you have run it on a freshly initialized SvelteKit or Vite–Svelte app template.

PostCSS
 ✅ successfully set up and repaired (it looks like it was in a broken setup before this command was run)!
Create or find an existing issue at https://github.com/svelte-add/svelte-add/issues if this is wrong.

Tailwind CSS
 ✅ successfully set up!
Create or find an existing issue at https://github.com/svelte-add/svelte-add/issues if this is wrong.

Run npm install to install new dependencies, and then reload your IDE before starting your app.

$npm i

$npm install -D @tailwindcss/typography
Edit the tailwind.configg.cjs.
plugins: [require('@tailwindcss/typography')],
install daisyUI
npm install -D daisyui
Edit the tailwindcss.config.cjs.
    plugins: [require('@tailwindcss/typography'), require('daisyui')],
	daisyui: {
		themes: false, // or ["light", "dark", "forest"],
		logs: false,
	}
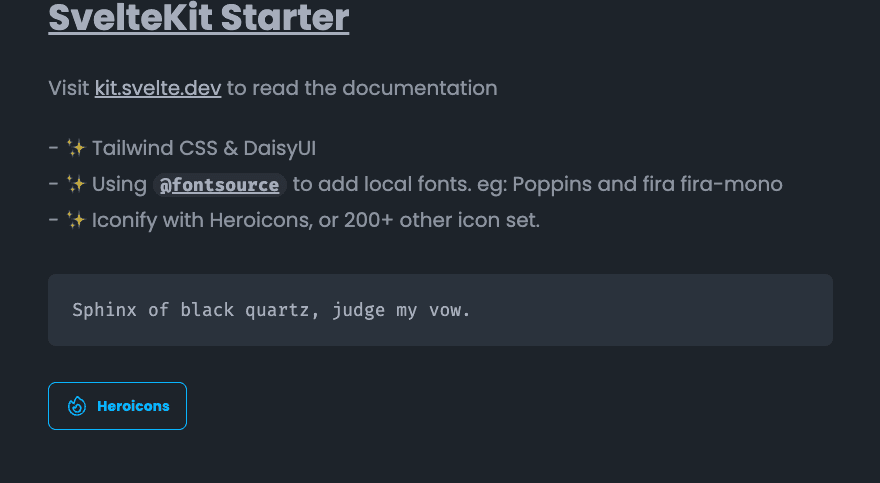
Add local fontsource and iconify
npm i -D @fontsource/poppins
npm i -D @iconify/svelte
npm i -D @iconify-json/heroicons
Import the local fontface in app.pcss.
@import '@fontsource/fira-mono/400.css';
@import '@fontsource/fira-mono/700.css';
@import '@fontsource/poppins/400.css';
@import '@fontsource/poppins/700.css';
@import '@fontsource/poppins/900.css';

@tailwind base;
@tailwind components;
@tailwind utilities;
Register fonts in Tailwind, add the fonts to the default sans font and mono font stack.
import defaultTheme from 'tailwindcss/defaultTheme'
...
    theme: {
		extend: {
			fontFamily: {
				sans: ['Poppins', ...tailwind_theme.fontFamily.sans],
				mono: ['Fira Mono', ...tailwind_theme.fontFamily.mono],
                firamono: "Fira Mono" // or register a new fontface class. font-firamono
		    }
		}
	},
...
Using the Iconify in the page
<script lang="ts">
    import Icon from '@iconify/svelte';
</script>

...

<button class="btn btn-outline btn-info">
  <Icon icon="heroicons:fire" width=24 height=24 />
  Heroicons
</button>
The final